Showing posts with label amazon product listings. Show all posts

Wednesday, 1 February 2017

Amazon Enhanced Brand Content: A New Way To Improve Your Product Listing


By Kym Ellis

I don’t know if you noticed it yet, but Amazon have quietly introduced a brand new feature for sellers. It’s called “Enhanced Brand Content”. Enhancing your brand content – your product listing – sounds like a long awaited feature to me.
This is really exciting news for Amazon private label sellers. I’m going to explain to you what it is and why you should pay attention to it. On top of that, I decided to use our Collaborative Launch product, Jungle Stix, as a case study. So I am going to include a run-down of how we added Enhanced Content to the Jungle Stix listing. Then we will take a look at some of the results so far.
If you do anything, there is a concise run-down of the benefits and pitfalls towards the end of this post. Make sure you know those details if you’re a private label seller!

What is Enhanced Brand Content?

Well it does do what it says on the tin. It’s an enhanced way to present your product information on your listing page. This will be welcome news to your ears (or eyes), if like me you would prefer to add a little bit of visual flair and enticing narrative to your product information.
You may have previously heard of Amazon A+ Content, which is something that you used to have to sign up for, (and pay a fee), in order to get access to rich-content product descriptions.
Usually this would allow high-profile sellers to add HTML based, premium content, from the Manufacturer, for example:
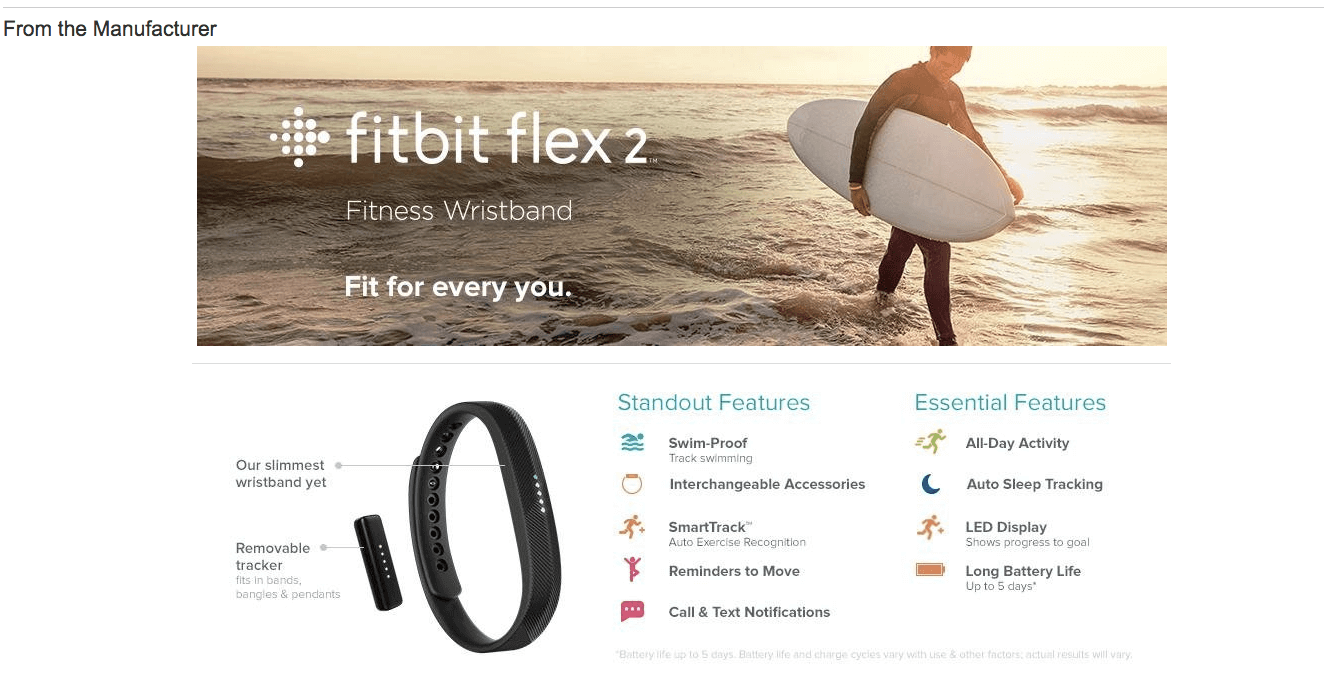
example of a+ content from manufacturer fitbit
Although Amazon is the biggest ecommerce platform that allows people like us to create a business and make loads of money, it can also be frustrating at times. Confession: I’m a control freak and I like to keep things neat and tidy. So when I first entered a description into Amazon Seller Central and saw my first glimpse of a preview, can you imagine how upset I was when I saw the text had all been squashed into one paragraph. Without any line breaks!

Enter Enhanced Brand Content (shall we call it EBC yet?!)
It’s not quite as flexible as having full custom-HTML control, as we will explore. But it does give you several easy-to-use templates, from which you can build a rich online shopping experience for your customers.
This allows you to:
  • Make your content more scannable – because we know people skim the internet
  • Add images within the description for more visual effect
  • Add subheadings, paragraphs, bold, italics, underlined text and bullet points
  • Section your content into logical chunks of information

Using Enhanced Content – 5 Simple Steps

Amazon has now opened this awesome feature up to third party sellers at no extra cost. Apparently, this is for a limited time, so it’s probably something they are testing. It’s actually happened quite low-key, but I believe it is available to all sellers who have private label products (that are under the Amazon Brand Registry).
I’m now going to walk you through the entire process, using Jungle Stix as an example. We will report on the sales metrics afterward.

Step 1 – Navigate to ‘Enhanced Brand Content’

Here’s where you can find it within Seller Central:
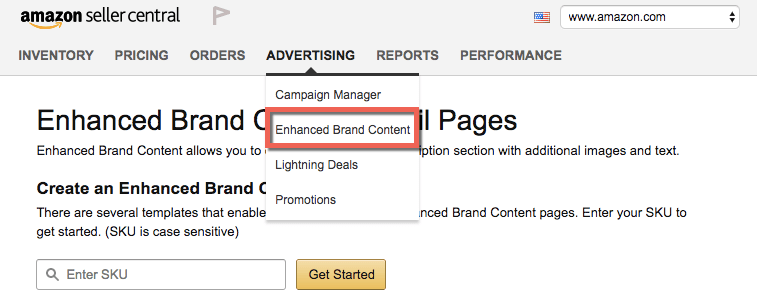
amazon enhanced brand content in seller central

Step 2 – Select a template

Easy enough. What’s next? You just enter the SKU you are looking to create Enhanced Content for and then you will be offered a choice of templates:
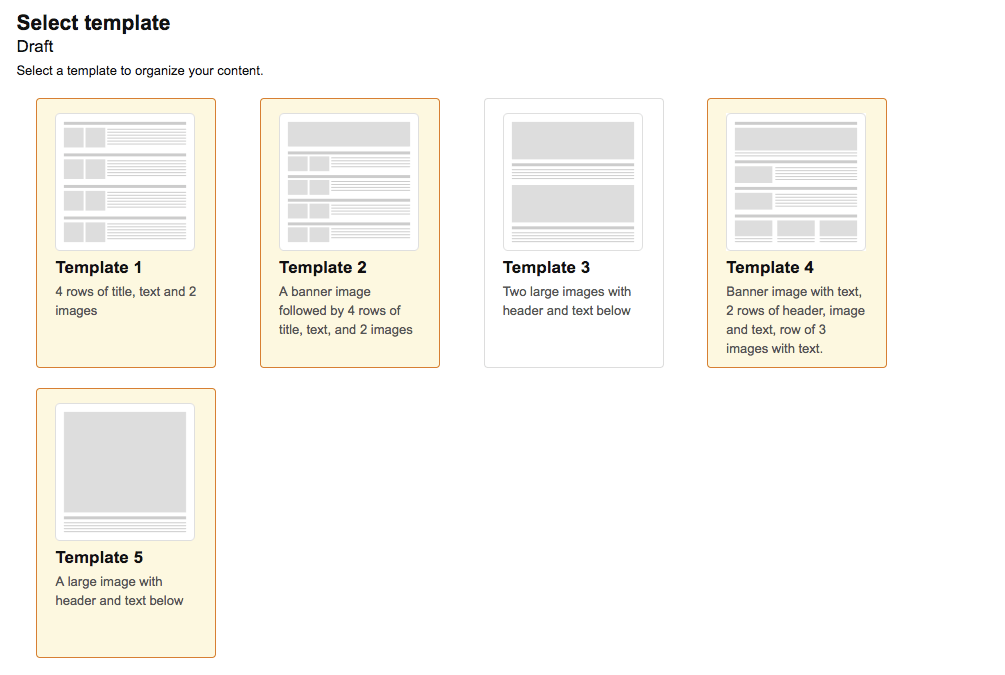
enhanced brand content templates
For Jungle Stix, I knew that I had a few sweet images and infographics to work with, so I selected Template 1. Don’t worry, if you choose the wrong one you can go back and change it at any point.
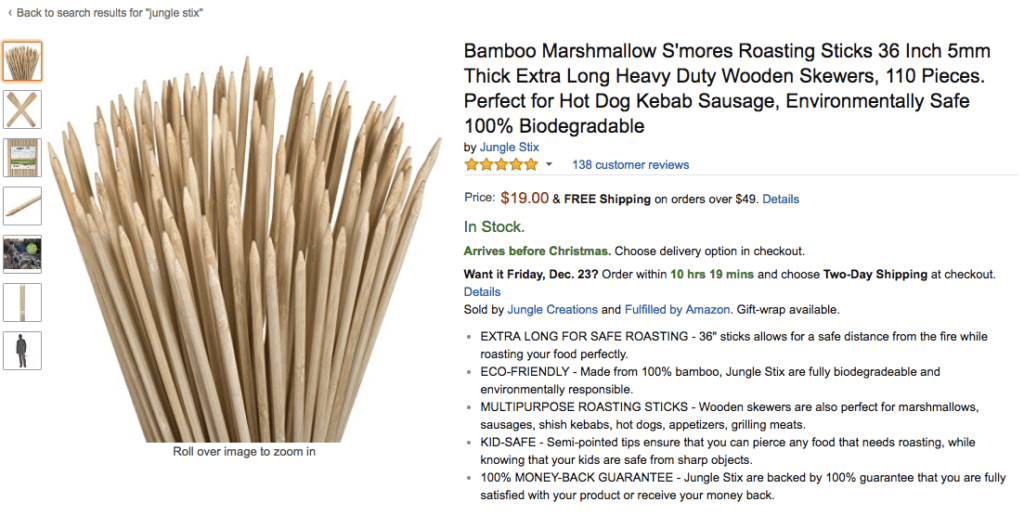
Just for reference, I want to show you what the Jungle Stix listing looked like pre-Enhanced Content:
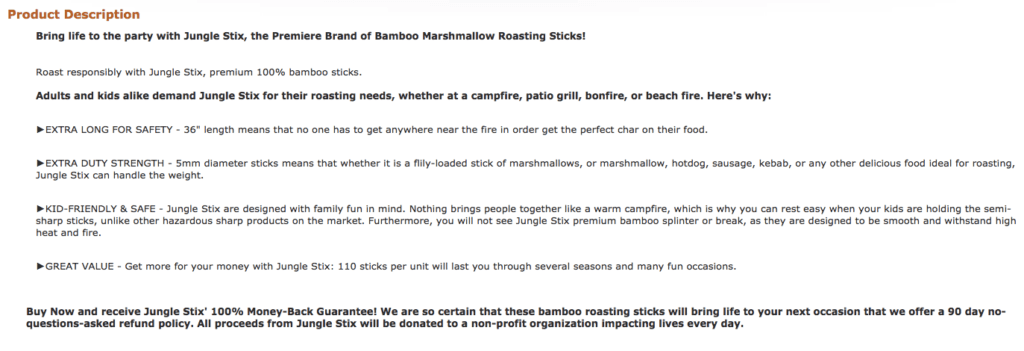
jungle stix listing before enhanced content
Jungle Stix original product description

As you can see, we have got some formatting in the description. But even so, it’s a pretty heavy portion of copy, which has a super wide line-width. (FYI, shorter line width is much better for readability, someone should let Jeff Bezos know this).

Step 3 – Add your content

I decided to attack this with our product listing in front of me, and with the folder of product images open ready to go. Take a few minutes to get yourself prepped for this.
We have spent quite a bit of time writing, optimizing and including keywords in our content and for the most part, I just want to break it up, and make it more visually appealing.
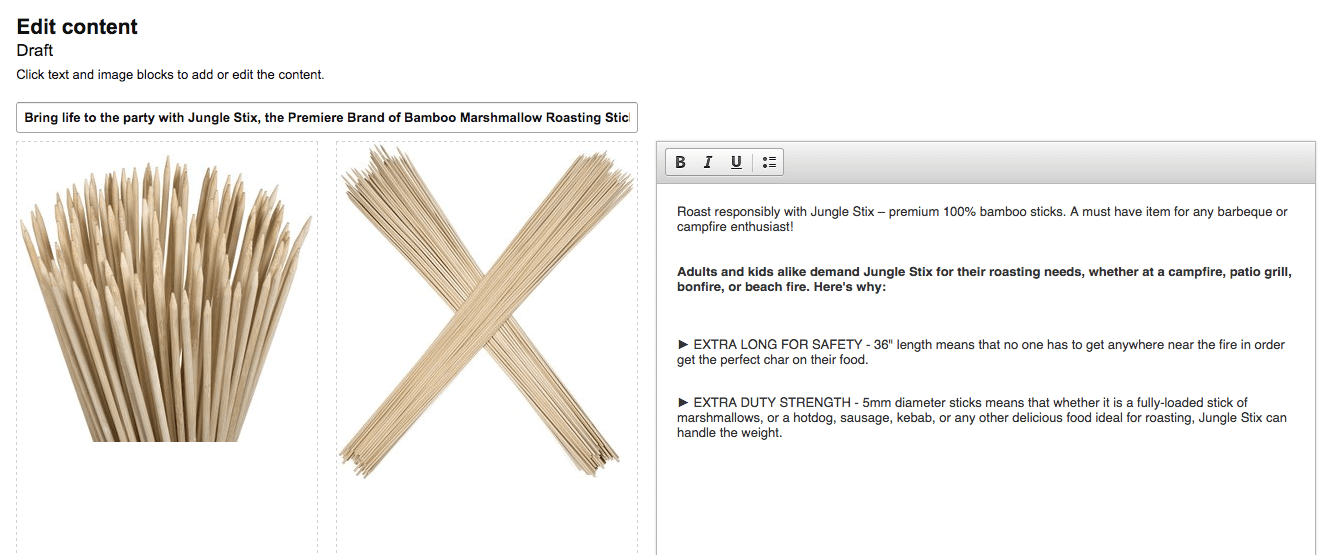
So here is where I edited the content based on the template I chose:
edit content fields enhanced brand content

It’s really straightforward, and as I move down the page there are more sections where I can add images and text.
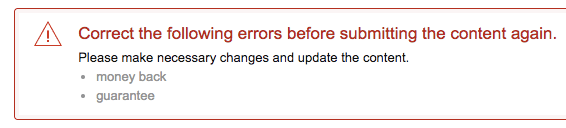
Once I was happy with my content, I hit the preview button and I immediately get some messages:
enhanced brand content errors

First of all, there are some words in there that are not allowed and it won’t let me submit my content with them included. Interestingly, these were unedited paragraphs from the original listing. Nonetheless, I reworded the copy to be in-line with the rules.

enhanced brand content report
As you can see above, you also get a useful notification if you have more space to add more content. Great!
At the moment I am happy with what I have got, but I may come back at a later date with some new lifestyle photography to spice things up.
Note: At this point I am using my existing product images which are all featured on the listing. In the future it would be worth exploring whether adding more / different types of images here would improve the performance of the product.

Step 4 – Submit for review

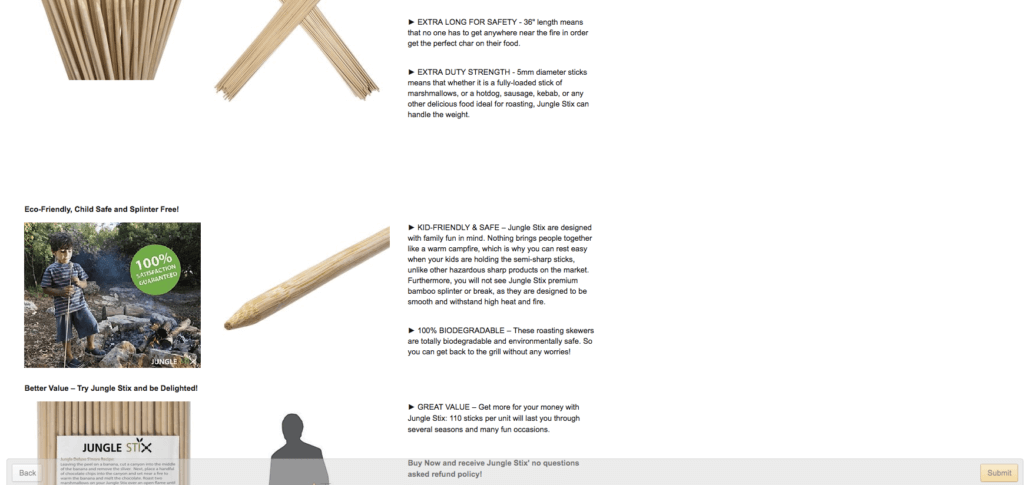
Once I was entirely happy and there were no errors I preview one last time:
enhanced brand content final preview
Then I hit submit and it goes off to the powers that be to approve it.
It took Amazon about a day to review the content I submitted. Guess what, it did not get approved the first time around. Here’s a screenshot of the report I received from the disapproved content:
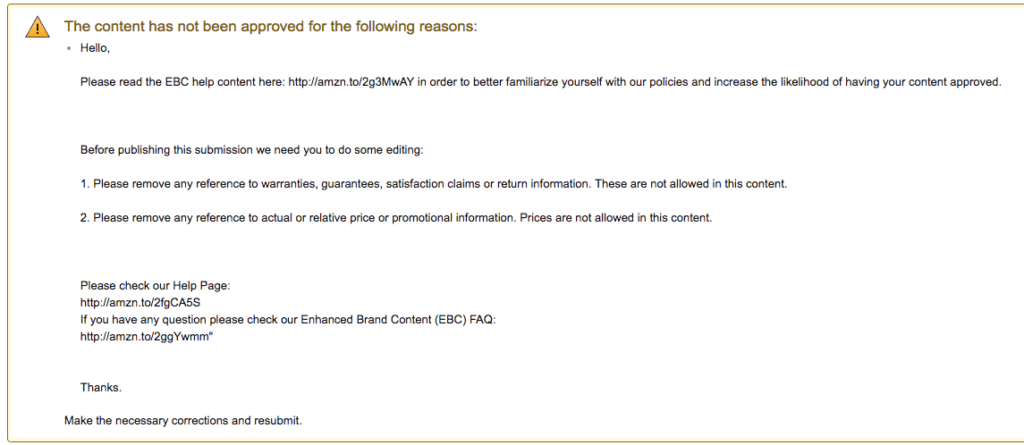
enhanced brand content rejection

So although I managed to get around the errors report previously by removing certain words about guarantees or satisfaction, it turns out that I needed to remove all reference of this.

Getting EBC content approved

It’s likely that this content is being approved by humans at Amazon, therefore any mentions of returns information that previously got through the submission errors will be picked up.
This is a good lesson to learn. It is slightly disconcerting that I have to remove this part of the copy from my enhanced brand content, as it was in the original copy and I know that the product has been performing well with it included. Nonetheless, I remove this and replace it with some other value re-enforcements, for example:
“Buy Now and be delighted with these deluxe marshmallow roasting sticks. These bamboo roasting sticks will bring life to your next occasion and many occasions to come.”
The second issue was to remove any reference to actual or relative price or promotion. When I scanned my content back, the only culprit I could find was along the lines of “get more for your money”, or “GREAT VALUE”, with a mention of the pack size of 110 pieces. This could have been picked up due to reference to ‘relative’ price. So I tried playing around with the value offering sentence:
“PRACTICAL & FUN – Get the most out of your purchase with Jungle Stix: 110 sticks per unit will last you through several seasons and many fun occasions.”
Don’t forget that any offending words or references need to be removed from the copy and any graphics or images.

Resubmitting for approval

Once happy with my edits I resubmitted for approval. Here’s the help page from Amazon with all of the requirements and rules for Enhanced Content.
After this I actually got more feedback, that was previously not included. This time it was that one of the images was not of a high enough quality for the size it was used in this content. I simply fixed this by sourcing and uploading the most high-res version possible. Particularly for any infographics or images with words on, it can look really bad if the quality is not high enough.
Tip: Ensure you have high quality photography and infographics if you plan to use Enhanced Brand Content. Even if it gets past Amazon’s checks, blurry images will look unprofessional.

Result: The Jungle Stix Enhanced Brand Content is live (as of 11th January 2017).
Once approved, Amazon will just automatically update your listing and your shiny new content will be there for all to see.
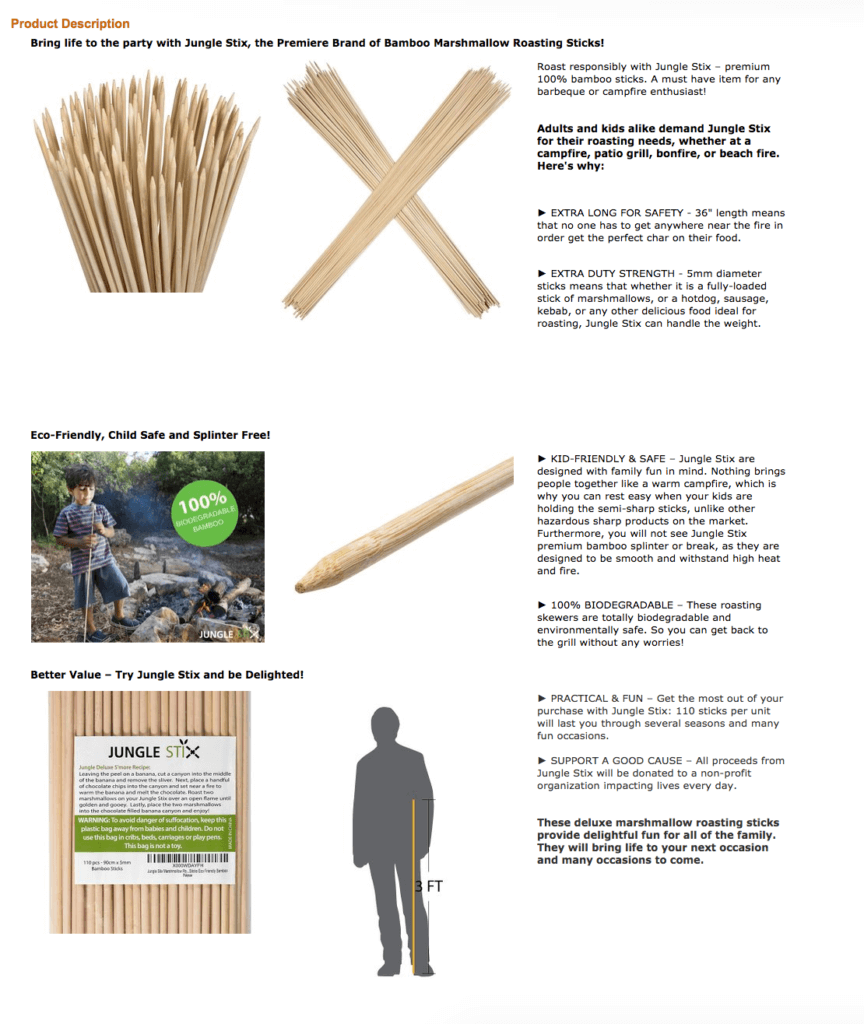
Jungle Stix EBC

There is some white space between the top two sections, which I thought was an issue with Amazon. Upon closer inspection, it might just be that the dimensions of one of the top two images is taller. Something that I can fix myself!

Best Practice

If you are just starting out with Enhanced Brand Content, and your copy is already optimized, then you might want to follow my footsteps and just apply the same copy and images to an enhanced template. This way, you can learn from any roadblocks.
But it is also a good idea to read through the rules. Judging by the scrupulous checks and the varied time it took to get a response, there are real human beings at Amazon checking this content.
For this listing, I used the same images from the main image block, which according to the rules is not allowed. But I was able to get this through still. (Oh and yes, more exciting photography is now on the to-do list).

Step 5 – Watch the results

We definitely want to know how Enhanced Brand Content has impacted our bottom line. I managed to get the Jungle Stix content live on the 11th of January. So how did it hold up after a couple of weeks of sales?
I like to do a side-by-side comparison with two date ranges. It’s early days at the moment so I can’t draw a statistical conclusion, but I will share some data for the first few weeks so you can see the thought process behind it.

Sales velocity

In the two week period prior to getting the content approved there were 161 total sales:
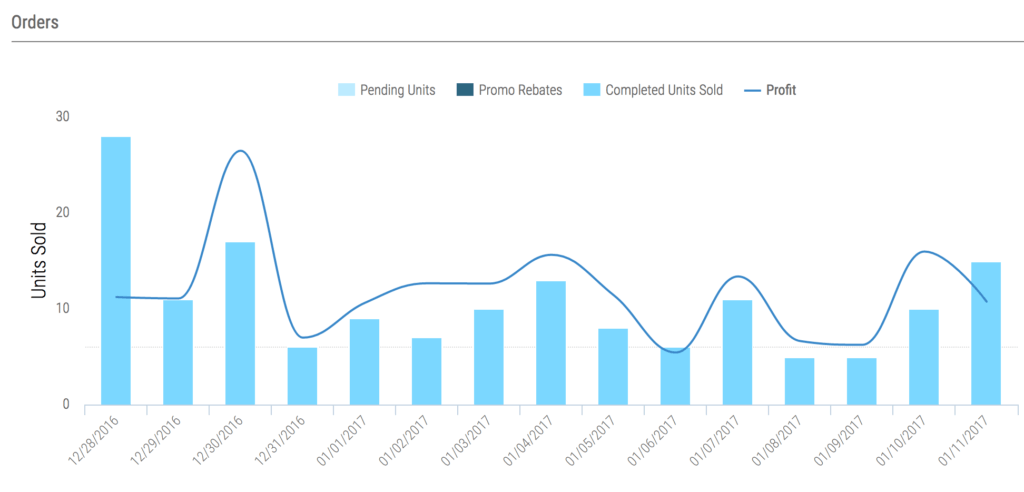
jungle stix sales two weeks prior to enhanced brand content
And in the two week period since approving the content there have been 176 total sales:
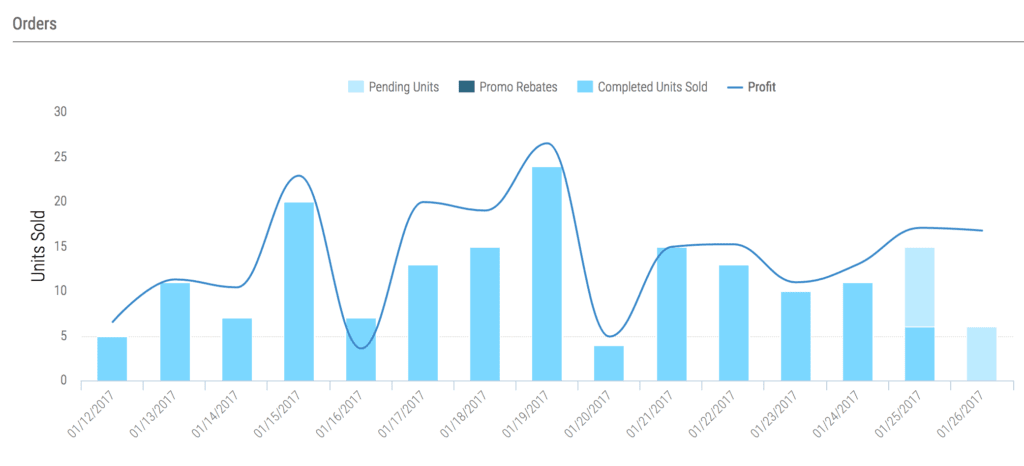
Jungle Stix sales two weeks after enhanced content was implemented
(This data view is from Fetcher – profit analytics software).
This shows that there has been a small increase in total sales, and you can also see some greater fluctuations day by day.

Check conversion rates

What we need to be interested in, though, is conversion rates. If we go to Reports > Business Reports > Sales and Traffic in Seller Central, we can find our conversion rate %:
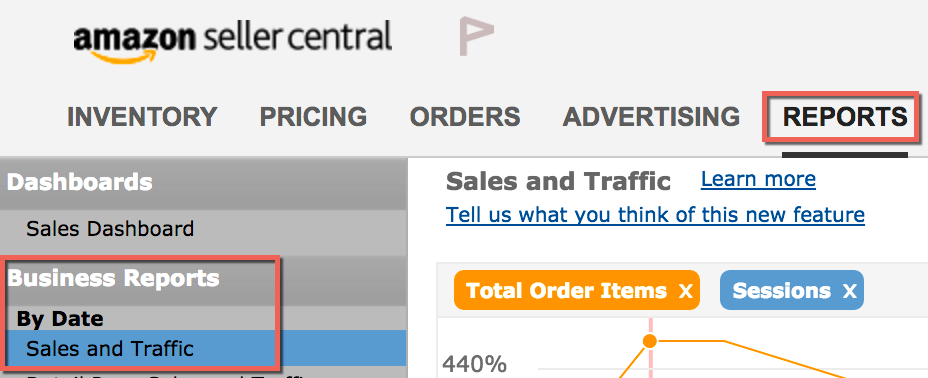
amazon seller central business reports to find conversion rate
In here you can select date ranges and see your conversion rates (taking into account number of sessions/views and sales). This will be listed as ‘Order Item Session Percentage’:

conversion rates in seller central

At the moment, Seller Central can not show the full two weeks (there is always a delay of a few days). But, I can see that conversion rate has barely moved from 5.07% the week before the enhanced content went live, to 4.92% the first week it was live.
As I mentioned, this is just a couple of weeks so it’s really too soon to tell. Obviously we will want to monitor this over the coming months to ensure it’s having a good impact. So far, sales haven’t tanked, but they haven’t increased dramatically overnight, either.
If your product has been selling for a long time, you can even do a year on year comparison, which works especially well if you know you have seasonality. In the name of transparency we will keep you updated on this when we have more data.

The benefits of Enhanced Brand Content

There are some obvious benefits to being able to add more to your product listings:
  1. It appeals to different types of shoppers. Whether you scan things, read every detail or stare at images for ages, this type of content is richer, more accessible and more likely to convert a wider range of viewers. It will probably make a better first impression from the off, and prevent some people from bouncing right off your listing.
  2. Opportunity to increases sales! The important one. Improving your listing can equal more sales and more profits. Time will tell how well Enhanced Content works. But it’s safe to say that the original enhanced content A+ sellers could utilize was available for a reason.
Changing your product listing from a regular listing to an enhanced listing might be a way to improve your conversions and profits. Now you can try it for yourself right within Seller Central.

What are the pitfalls?

  • There has been some eagle-eyed suggestions that your copy in EBC will not be indexed. Therefore adding your target keywords or long-tail keywords will be ineffective when consumers are searching. (Read more here – scroll to item #3).
  • All EBC content is being approved by human beings, so you can get away with less. A lot of the content that we had disapproved was in our previous listing.
  • This means that you may need to remove copy that you previously knew was working well for you.
  • Takes a while to get approved – in my experience so far it can be anything from a day to well over a week. I actually just resubmitted some revised content for our Jungle Scout T-Shirts, because it took so long.
  • You really must have high-quality images and graphics as well as engaging content. If you don’t have these, then it’s time to get to work.

Conclusion

So that’s all on this topic for now. It will be interesting to see what Amazon does next to give sellers more creative freedom with our product listings. As an opportunity to provide a richer shopping experience and increase your profits, this is one thing I would recommend you keep on your radar for 2017.
However, as it’s new and because we are not yet sure of the impact it is having on sales, approach with some caution. Try this out with some of your products and test what works. Keep a close eye on your sales over a period of time, and make sure you keep a backup of your original description copy.

Thursday, 15 September 2016

3 Deadly (and Common) Mistakes Sellers Make With Their Amazon Listings


By Karon Thackston

You only have to write so many product listings before you start to see a pattern. That’s how it has been at Marketing Words over the last few years. I thought it would be helpful to outline some of the most common (and crippling) mistakes we’ve seen when it comes to writing your listing and using keywords.
Mistake #1: Not Using Keywords Correctly
Amazon isn’t like Google. With Google, there is a certain amount of repetition of keywords and phrases. On Amazon, however, you do not need to repeat keywords. Use it once and Amazon’s got it! Because many sellers don’t understand this, they are ruining the way their copy sounds as they try to rank higher on Amazon (without success).
That includes your Search Terms fields. If the keyword is in the title, brand, manufacturer and UPC, you do not need to include it in your search terms.
Last, we see countless folks inserting keyPHRASES into the search terms fields instead of keyWORDS. Amazon doesn’t work with phrases. They use literal keywords and each word is searchable on its own.

Putting something like:
natural dog treats
100% wholesome dog treats
beef dog treats
dog treats made in the usa
nutritious dog treats
… leaves lots of wasted room that could accommodate other keywords. Because we don’t need to repeat keywords and we do need to use individual keywords (not whole phrases), this should be reworked to this:
natural dog treats 100% wholesome beef made in the usa nutritious
Any and all combinations of those terms are searchable.
Mistake #2: Not Differentiating Your Products From The Competition
Think about your own shopping experience on Amazon. You show up on the site to search for olive oil and vinegar sets. I just did a search for that term and here’s what came up…

When I was scrolling down the page, it didn’t take me long to figure out that they all appearpretty much the same. What if they gave some additional information or used words that were more enticing?
Here are some examples of how just a minor tweak can make a big difference. As a shopper, I would be more likely to click these search results:

The simple words “ribbed,” “Italian collection” and “lead free” made my eyes perk up. I wanted to know more.
Mistake #3: Not Answering The Question “So What?”
With so many duplicate products on Amazon (especially when dealing with private labeling), you simply must fall back on a long-standing rule of copywriting: Answer the question “So what?”
When customers scroll down a page of search results looking at your title, or they click to your product page to learn more, you have to set yourself apart from all the other options. Maybe this means having more positive reviews. Perhaps it is the lowest (or highest) price. But, more often than not, that task depends on the bullets and product description.
Here are 30 ways to differentiate your products from the pack so you stand out and get more sales.
By correcting these 3 common mistakes, you eliminate the wasted space in your search term fields, bullets, and product description while setting yourself apart from the competition. And that always leads to more sales! 
Wimpy product listings don’t make sales! Watch Karon develop product descriptions that drive traffic and get more sales LIVE during her Amazon Product Description Boot Camp.
She’ll reveal (in deep detail) her best-kept secrets for doing keyword research and creating product copy that earns you more money. Early birds can save when you register now! Use code   boot37 (lower case, no spaces)   to reserve your space.This LIVE 4-week training begins September 15, 2016.  (YES! Replays will be available.)
- Make sure you're not making these mistakes on your Amazon listings! 

Thursday, 8 September 2016

Amazon SEO: How To Craft an Amazon Listing That Sells


By Gen Furukawa

Why Is Search Engine Optimization Important For Amazon

For digital marketers working in ecommerce, the holy grail is to have the right product appear in front of the right customer, at the right time. If you are an Amazon seller, the urgency of appearing at the right time is magnified: Amazon sellers are purchase-oriented, looking to find their desired product and purchase it. They are lower in the sales funnel. Hence the importance of Amazon SEO.
As Amazon sellers, we do not have the luxury of having a multi-touch sales process. It’s a one and done deal. This is especially true for private label products, which aren’t competing on brand recognition or customer loyalty, but instead on product features. Therefore, it is uber important to create an optimized Amazon product listing, which is optimized from top to bottom with two goals in mind:
  1. Get your product found by Amazon users
  2. Convert a visitor into a customer
So how does a customer who doesn’t know you (and frankly doesn’t really care about you) find your product? The Amazon search bar.
Search is the primary way that customers find products on Amazon. In fact, 44% of consumers start their product search on Amazon, altogether skipping search engines like Google. And you better believe that these are purchase-driven customers, itching to use Amazon’s one click checkout. Here’s a look at how US consumers start their product searches:

How To Get Found On Amazon

Before you put your listing together, you want to spend some time finding the most relevant keywords to target. There is an art and science to keyword research–we covered three helpful keyword research techniques in this post recently.
Once you have selected the main keywords that are relevant to your product, which have significant search volume, you want to incorporate these into your Product listing: Title, Product Features, Product Description, Keywords (on the backend), etc. Choosing good keywords to target will greatly increase your product’s visibility in organic search results, and therefore get you more visitors and sales.
For example, for Jungle Stix, we targeted “bamboo marshmallow sticks”. We focused on this keyword and related keywords in the Product Title, the main product features, and throughout the listing. It looks like we have optimized the listing well, as it is currently the top organic ranking for a user who searches “bamboo marshmallow sticks”:

How did we get there? There are many factors that Amazon uses to determine the organic search results, including price, sales history, sales velocity, reviews, ratings, and more. In this post, we will explore Amazon’s search engine optimization (SEO), and uncover some actionable tips to get your product ranked for the keywords that you want to target.

A9: The Foundation of Amazon SEO

Amazon’s search algorithm comes from a subsidiary company called A9 (any Amazon data nerds who want to get a vague scent of what Amazon is up to should poke around the site—interesting stuff). A9 is the brains behind matching a customer search query with the most relevant products in the Amazon catalog, instantly. A9 is so crucial to Amazon’s business model because it powers the one primary metric that matters the most: revenue per click. Regardless of what the inputs that Amazon uses in spitting out the organic search results, honing in on offering the most relevant product to a customer search query is the best way for Amazon to generate a sale.
Amazon has laid out some of the elements of a product listing that creates a “compelling offer” for the customer. We get a sense for the A9 algorithm in Amazon’s article on Optimizing Listings for Search and Browse:
Factors such as degree of text match, price, availability, selection, and sales history help determine where your product appears in a customer’s search results. By providing relevant and complete information for your product, you can increase your product’s visibility and sales.
These are the underlying elements of creating an Amazon search engine optimized listing. Some of the helpful best practices that Amazon lists, include:
  • Don’t Include Your Competitor’s Brand Name or Misleading Information:Including keywords that are misleading are against Amazon’s Terms of Service, and can lead to product removal and account suspension. Jeff Bezos doesn’t like it when you lie to him!
  • Don’t Keyword Stuff: Amazon calls this “providing redundant information captured in other fields”. With Amazon SEO, more is not always better. Don’t repeat your keywords.
  • Don’t Use Punctuation in Keywords: Only use a single space to separate keywords, no commas, semicolons, dashes, etc. Anecdotally, including punctuation can reduce the number of keywords that your product ranks for.
  • Don’t Add Common misspellings, variants, or synonyms: Amazon captures common related words, so no need to include those in your keywords section. For example, “marshmallow stick”, “marshmellow stix”, and “marshmellos stick” will all be captured with just one keyword.
You can enter your hand-picked keywords in the following places in your listing:
  1. Product Title
  2. Key Product Features (bullet points)
  3. Product Description
  4. Product Picture file name
  5. Search Terms (found while editing the product in Seller Central)
Let’s dig in to some of these sections:
 Product Name (Title):
The Product Name is the heartbeat of your product listing, both to customers and to the Amazon algorithm. This means that you need to appeal to the human reading your title (and therefore aim to get them to click through to your listing) as well as the Amazon algorithm that is looking verify any relevant between your listing and the customer search query.
Amazon suggests including the following in your Product Title:
  • Brand
  • Product
  • Key features
  • Size
  • Quantity
Though it is unstated in Amazon’s official policy, it is an SEO best practice to put your most important keywords (which you have already identified, based on search volume and relevance) towards the front of the title. This helps potential customers get a quick idea of what your product is while scanning through organic search results.
You are allowed to have up to 250 characters in your product name. Jungle Stix title currently has 193 characters. It is important to note that each word in the Title is searchable on its own. This means that you do not need to repeat words in the Title, and it is against your best interest because it uses up characters, and makes the Title appear more text-heavy which is not necessarily a great customer experience. The specifics of what you can include in a Product Title differ by category, so you will want to check for your specific product.
The Jungle Stix title does look long, but we were thoughtful about including all relevant search terms that people may want related to “bamboo marshmallow sticks”. Furthermore, there are no repeating words, or article words (ie the, a, and an).

Key Product Features (Bullet Points) & Product Description

The Key Product Features and Product Description are searchable by customers, so influence your Amazon SEO. However, the text is also an opportunity for you to showcase the features and benefits of your product, to improve your conversion rate. This is where you can share important facts about your product–ideally you have a solid understanding of your customer profile, so you address any pain points or objections that your customers have.
Amazon’s best practices for Key Product Features focus on creating clear and concise bullet points:
  • Highlight the five key features you want customers to consider, such as dimensions, age appropriateness, ideal conditions for the product, skill level, contents, country of origin, and so on.
  • Reiterate important information from the title and description.
  • Begin each bullet point with a capital letter.
  • Write with sentence fragments and do not include ending punctuation.
  • Do not include promotional and pricing information.
This Pet Groom Tool example includes a nicely formatted and descriptive key Product Features:

And the Product Description is also thoughtfully constructed, with some simple formatting and spacing, and additional features not included elsewhere in the listing:

Keywords & Search Terms

Amazon includes several places for you to identify the keywords that you are targeting. In addition to the text and keywords that you add in your Product Title, Product Features, Description, you can specify your keywords in Seller Central’s Keywords Tab:

You want to include additional keywords that you have not focused on in your Title, Description, and Features section. For Jungle Stix, we pulled some actual customer search queries from the pay per click campaigns that we were running. We will cover a few additional places to find keywords later in the post. One point to remember here is that you do not need to include punctuation like commas or semi-colons, and in fact you should avoid doing so as it could limit the reach of your keywords.

Product Images

Including high-quality product images are very important to generate initial customer interest, convey the qualities of the product, and ultimately convert the visitor to a paying customer.
The images therefore are hugely influential on conversion rate and click through rate of a product. Amazon lays out some simple guidelines that should be intuitive as you put your listing together, including:
  • The image matches the product description in size, color, and so on.
  • The image is a photo and not a drawing
  • The product is focused and well-lit.
  • Close-up shots are not obscured by highlights or shadows.
  • The product occupies at least 80% of the image area
  • Backgrounds are simple and clean so as not to distract from the product.
Furthermore, including multiple images, at different angles, is recommended. Amazon allows up to 9 images, so why not use that opportunity to get your customer yearning to own your product.
The most helpful thing you can do with your product images to give a lift to your conversion rate is use images at least 1000 pixels. This will allow your product to have the hover-to-zoom effect that allows users to  get up close and personal with your product.

Improving The Performance of Your Listing

Focusing on crafting the elements above, including the Title, Features, Description, Images, and the keywords you target, will ultimately set you up for success. But what is “success”, beyond just growing sales? There are two important metrics that you can focus on to measure and improve your success: your conversion rate, and your click through rate.
Conversion Rate: Conversion rate is percentage of visits to your product page that result in a sale. It is calculated as follows:
Conversion Rate = Total Order Items / Sessions
In Seller Central, you can see the conversion rate of your product by going to Reports – >Business Reports -> Sales and Traffic  and then looking at the Order Item Session Percentages. This is what it looks like for Jungle Stix:

The three most important factors to improving your conversion rate are:
  • high quality product images
  • competitive price
  • social proof (number, and quality, of reviews)
Click Through Rate – Click through rate is simply the percentage clicked on your product listing.
It is calculated as follows:
Click Through Rate = Sessions / Page Views
In Seller Central, in the same Sales and Traffic report as above, you can calculate your click through rate manually by dividing the sessions y page views. This is what it looks like:

The three most important factors to improve your Amazon click through rate are:
  • High quality product images
  • Competitive price
  • Social proof (number, and quality, of reviews)
Both of these figures, your Conversion Rate and Click Through Rate, can be measured on a daily basis. As you make adjustments to different parts of your listings, you can see changes reflected in these metrics.
For example, if you start testing a different main product image, you may see an uptick in your click through rate, and sessions. Or if you change the main keyword that you are targeting, you may eventually see a dip in sessions, but a lift in sales, as you are targeting more relevant traffic.
Your conversion rate and click through rate are going to be dynamic, changing based on changes in traffic, customer behavior, and market conditions in general. It is tremendously helpful to stay attuned to these changes, and proactively make necessary adjustments. This means consistently running split tests to optimize the keywords you target, the images you use, your price, and much more. Splitly allows you to automate the your split tests and analysis, or just change your listings manually in Seller Central and keep track of the data.

A Note On Pricing

Amazon notes that Price is a primary factor in your product’s organic rankings. They suggest (not so subtly) in this post that your product should be “priced competitively against comparable products”…research the competition as you develop a compelling price point.”
Pricing products can get tricky for private label products. Especially in the very beginning launch phases, the value of a brand is virtually worthless for private label brands. At least it can not justify a significant markup. This forces our hand as private label sellers to fall within the general range of competitive private label products.

LSA: A Helpful Way To Expand Your Reach

Latent Semantic Analysis (LSA) is a fancy way of describing computer-generated synonyms. Basically, there is a rating system (called Latent Semantic Index) that assigns a value between 0 and 1 for words that are similar—closer to one if they are more similar, closer to 0 of dissimilar. Search engines crawl the contents of a page and pull out relevant keywords to identify the content of the page.
This is relevant to Amazon SEO because you can increase the likelihood of your product being found via organic search: by including more LSI keywords, you expand the keywords that trigger your product to be shown.
One nice tool for this is LSI Graph it is a free site that automatically generates relevant keywords. For example, for our main keyword of “marshmallow sticks” we get a list of keywords like the following:

You can get similar results in Google Keyword Planner, however there are some additional keywords that you may uncover with LSIGraph. And if much of your competition is also using GKP, and basing their listing off of the same data, you are not allowing yourself to differentiate and find new keywords.

In Conclusion

If you have made it this far, you have earned the secret to Amazon SEO: create value and offer a quality product (both in the product listing and the product itself), and you will be rewarded handsomely. Amazon summarizes this very succinctly in their Seller Central documentation: “Sales conversion begins with listings that are easy to find and offers that are compelling.”
If you can focus on the basic “blocking and tackling” of understanding your customer’s needs, how your product addresses that, and convey that in a compelling manner through text and images, then Amazon will show your product more often, and visitors will be more likely to convert into customers. Those customers leave you a good review, and the good reviews lead to social proof and increased conversion rate. And the flywheel continues, onwards and upwards!
- Does your Amazon listing need help? Read this and tell us what you think in the comments!

Friday, 26 August 2016

The New Policy To End Amazon Listing Hijackers: Important Update


By Greg Mercer

If you are an Amazon seller, you may have received an email with the foreboding subject line, “Important Information about your Seller Account”. However, the policy updates will actually be favorable for sellers. In short, Amazon will require approval to sell some private label brands. Sellers need to seek approval by August 30th, 2016. If you do not obtain approval before 8/30, the listings for these products will be removed. OK, sounds serious, I’m not going to call that bluff…

This is what the email looks like:


Why is Amazon starting this new policy, with such a short turnaround time? My hypothesis is that they are addressing the growing problem of listing hijackers. I wrote about the Amazon’s listing hijackers in this post, which is a helpful read to see what a pesky and troublesome problem they can be
Here are the exact steps that Amazon sent out for how to seek approval for the affected products
1. In Seller Central, click the Inventory menu, and then select Add a Product.
2. Search for the ASIN you want to sell.
3. In the search results, click the Listing limitations apply link next to the ASIN.
4. Click the Request Approval button to start the application process.
* Three invoices for affected branded products that combined reflect your acquisition of at least 30 units in the past 90 days; or
* A letter of authorization from the brand owner confirming that you are authorized to sell affected branded products.
I think that this will encourage private label sellers to go through the Amazon Brand Registry program to register their brands in order to gain approval.

A Note On The Amazon Brand Registry

The Amazon Brand Registry is a helpful way for private label sellers who manufacture and sell their own products. By registering your private label brand with the Amazon Brand Registry, you are officially noting with Amazon that you are the brand owner. This makes it easier for private label sellers and brand owners to list their own products on Amazon, and protect their listing against listing hijackers who would attempt to sell a counterfeit or second
There are additional benefits to the Amazon Brand Registry, which is noted as the following by Amazon:
Influence the product detail information for your branded products: As the registered brand owner, you will have increased influence in editing the information on product detail pages for your registered branded products, which then helps you to specify the correct titles, details, images, and other attributes for your branded products.
List products without standard product IDs: Registering your brand enables you to specify an alternative key attribute that you can use to list your branded products instead of a standard product ID (UPC or EAN).
I set up my brand registry in about two minutes. It is super simple, it can be done in two quick steps, assuming you have a landing page set up for your product. If you don’t have that, fear not, it is much easier than it sounds. I would recommend purchasing a cheap domain on GoDaddy, and directing it to a free WordPress.com theme. It doesn’t take any technical skills to set up your website, just following the instructions carefully.

Step 1: Complete The Amazon Brand Registry Application
Calling it an “application” sounds more intimidating than it is. This is Step 1 of 2:
And this is Step 2 of 2:
After completing the two pages, you get this notification of completion!

Why Is This Policy Change Important?

 This policy change is important because it restricts how people can sell a private label brand. It is now not so easy for anyone to sell just any product, which means that you will have to have registered a brand in order to sell the brand. I am not completely sure at this point whether this will effect only major brands, or any private label brand. I will certainly update this as it becomes more clear (Amazon’s policies are never crystal clear right away). Moreover, I am not positive yet whether this application is necessary only for brands which have gone through the Amazon Brand Registry.
I think what is clear though is that many sellers will get their brands registered. And with a process that is so simple, as noted above, why not?! This is a good step to take in order to protect your brand against hijackers, so that the whole problem of listing hijackers will be a thing of the past.
One interesting ripple effect will be on people who do retail arbitrage–buying products at a steep discount and reselling them for a profit on Amazon. This new policy change may not effect some of the large Retail Arbitrage sellers, however, the smaller sellers may have to make significant changes to their business. This means maybe shifting towards private label sales.

In Conclusion

There is still a lot that remains murky on the details. The most important actionable takeaways from this policy update are twofold:
  1. If you’re selling other brands, apply for approval as soon as possible
  2. Register your brand ASAP
These are simple steps to take, and could prevent major headaches in the future. In an ecommerce environment that is getting more competitive, and which relies on brand differentiation and customer loyalty, I think that this just forces our hand to do what should have been done already.
If you have any different interpretation of this policy update, or have received direct feedback from Amazon’s Seller Support, please share your thoughts with the community in the comments section below! Likewise, I will share any updates that I receive as soon as possible.